Getting Started
The Harp Hobgoblin is a simple multi-purpose device designed for learning the fundamentals of the Harp ecosystem. The principles demonstrated in this tutorial series can also be applied to other Harp devices.
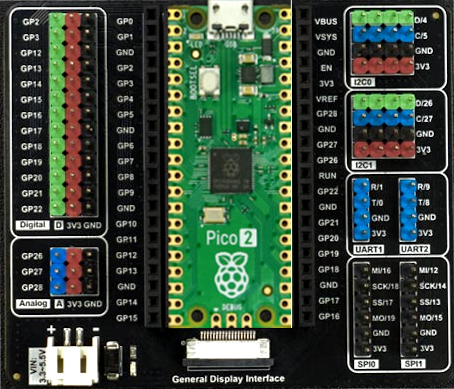
Pico2 board mounted on Gravity: Expansion Board
Note
The Hobgoblin can be interfaced with a variety of input and output modules using the Gravity: Expansion Board. For more information on how to assemble the board, along with recommended sensor kits, refer to the resources in the harp-tech/device.hobgoblin repository.
Installation
- Install Bonsai.
- Install the
Harp.Hobgoblinpackage by searching for it in the Bonsai package manager.
Flashing the firmware
- Download the latest version of the firmware that matches your Pico board.
- Press-and-hold the Pico
BOOTSELbutton while you connect the device to your computer's USB port. The Pico will be mounted as a new flash drive. - Drag-and-drop the
.uf2file into the drive.
Testing the device
- Connect a push button to analog input channel
0(GP26) on theHobgoblin. - Set the
PortNameproperty of theHobgoblinoperator to the communications port of theHobgoblin(e.g. COM7). - Run the workflow and double-click the output of
AnalogInput0. The value should change when the push button is pressed.
Installing harp-python
The harp-python library provides a low-level interface to read and manipulate data from Harp devices. You can create a Python environment with harp-python using uv:
- Install
uv. - Create a new folder for the project.
- Navigate to the folder and initialize a new environment:
uv venv
- Install
harp-pythonas a dependency:
uv pip install harp-python