Ports and connections
This article will cover the ports, controls, and status indicators on the Sound Card and the Audio Amplifier, as well as how to connect them to each other and to external devices.
Sound Card
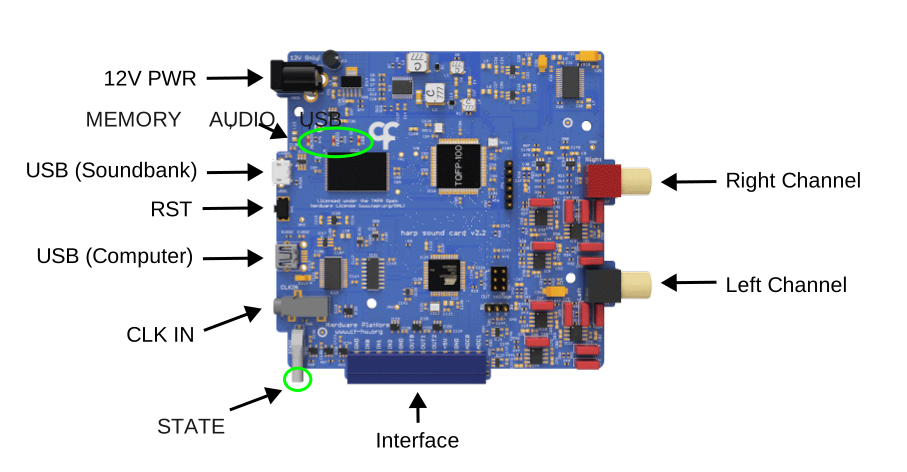
Ports
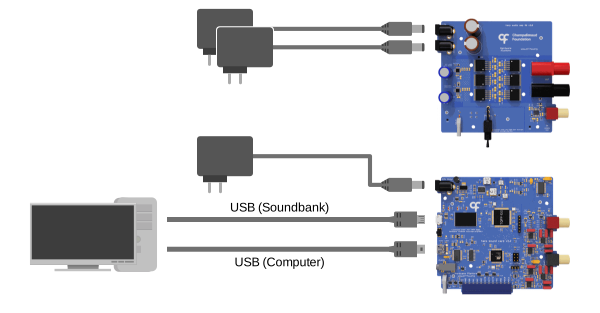
12V PWR (Barrel Jack) - This port powers the Sound Card and requires a 12 V power supply.
USB (Soundbank, Micro-B) - This port connects to the device's onboard sound memory bank for uploading waveforms. Once the sounds have been uploaded, the cable can be disconnected, as it is not required for sound playback.
USB (Computer, Mini-B) - This port connects to the device's internal controller to control sound playback with Bonsai or the Sound Card app.
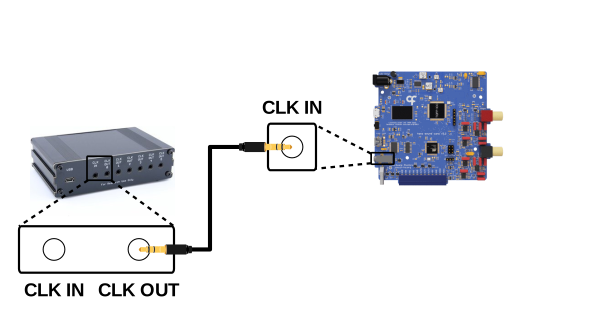
CLK IN (Stereo Jack) - This Harp clock input port accepts a clock output from any compatible Harp clock generator or synchronizer (e.g. Timestamp Generator Gen3), which can be used to synchronize the internal clocks of connected devices.
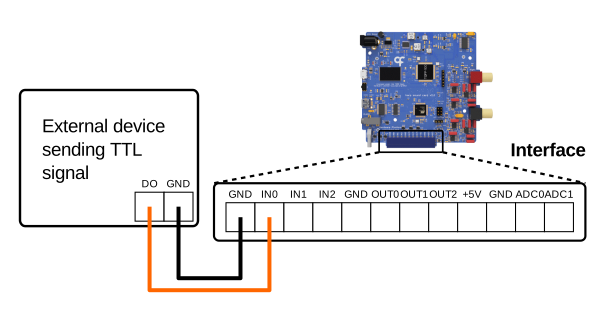
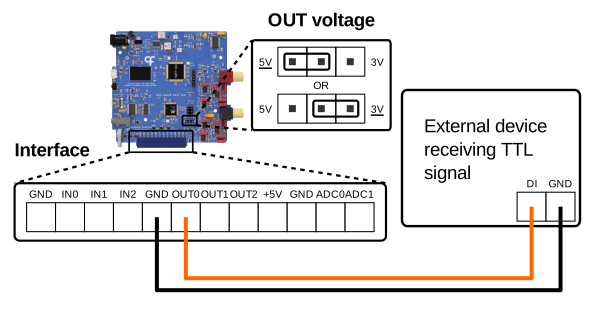
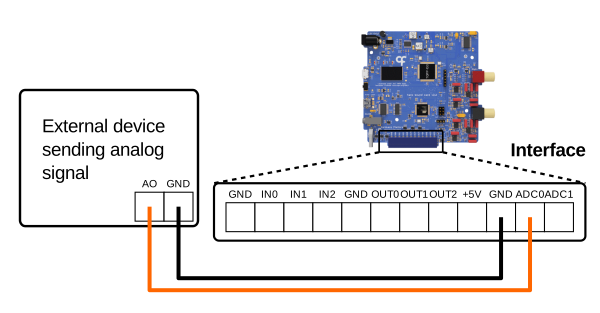
Interface (Screw Terminal) - These general purpose input/output (GPIO) pins can be used to communicate with external devices, for example to trigger or signal sound playback. Refer to the connection guide below for more information.
Left Channel (RCA) - This port can be used independently for mono output or together with the right channel for stereo output. Needs to be connected to an external amplifier and speakers.
Right Channel (RCA) - This port can be used independently for mono output or together with the left channel for stereo output. Needs to be connected to an external amplifier and speakers.
Controls
RST - This button resets the sound controller in case of an error during sound upload or playback (not typically needed). The reset does not remove sounds stored in the soundbank or affect the connection between Bonsai and the device.
Indicators
STATE - This LED cycles on and off with a period of:
- 2 seconds when it's communicating with Bonsai
- 4 seconds when in standby
- 100 milliseconds when a catastrophic error occurs
MEMORY - This LED turns on when the device is reading or writing to the soundbank. If it remains on, there is a problem accessing the soundbank.
AUDIO - This LED turns on while the device is producing audio.
USB - This LED turns on when sounds are being uploaded to the soundbank. It also remains on if the device does not detect a connection between the computer and soundbank.
Audio Amplifier
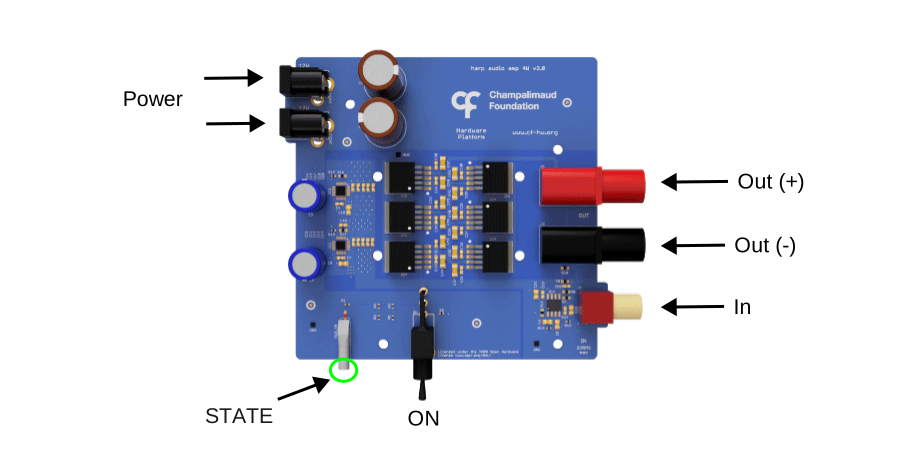
Power (Barrel Jack) - These ports power the amplifier and require two separate 12 V power supplies, one for each power input.
In (RCA) - This port accepts an input from one of the Sound Card's output channels.
Out (Banana Plug, +/-) - These terminals connect to the positive and negative terminals on a speaker.
ON - This switch turns the amplifier on and off.
STATE - This LED turns on if the amplifier is powered and the ON switch is enabled.
Connections
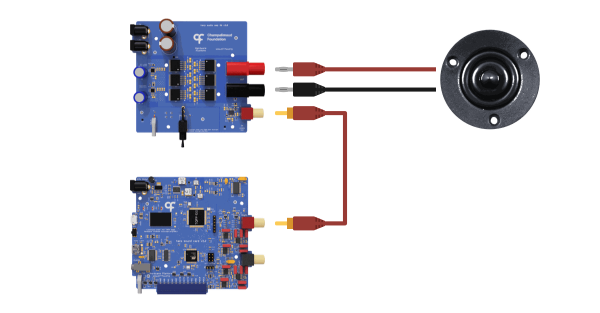
- Connect the Left Channel or Right Channel port on the Sound Card to the IN port of the Audio Amplifier with an RCA cable.
- Connect the positive (+) speaker output of the amplifier, usually red, to the positive terminal of the speaker. Any speaker with an impedance from 4 to 8 Ω can be used with the Audio Amplifier. The XT25SC90-04 (Peerless by Tymphany) offers a good frequency response up to 80 kHz.
- Connect the negative (-) speaker output of the amplifier, usually black, to the negative terminal of the speaker.
- Repeat steps 1 to 3 with a second amplifier and speaker for the other channel for stereo output.
Note
Third-party amplifiers that accept line-level RCA inputs can be connected in the same way. Check the amplifier specifications for supported speaker impedance and power ratings when selecting a speaker. Consider using the Audio Amplifier for high-fidelity applications, as its performance with the Sound Card has been characterized in this publication.
Note
Pure tone playback from the internal sine wave generator is currently limited (as of firmware v3.0) to the Right Channel. Connect the amplifier and speaker to this channel if you plan to play pure tones.
Documentation for release v3.0.0