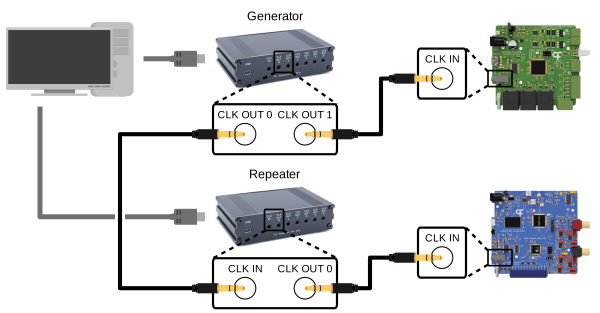
Ports and connections
This article covers the ports, controls, and status indicators on the Timestamp Generator Gen3, as well as how to connect the device to a computer and to the Harp devices it will synchronize.
Front panel
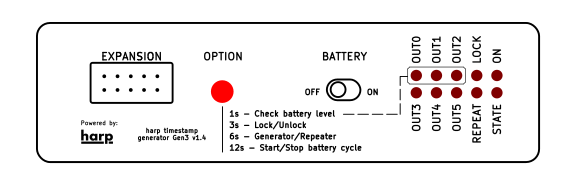
EXPANSION (Box Header) - Connector reserved for future expansion modules.
OPTION - Multi-function button. The executed action depends on how long the button is held before it is released, following the legend printed below it. While the button is held, the LOCK LED blinks once the lock option is reached, the REPEAT LED once the mode option is reached, and the OUT LEDs once the battery cycle option is reached.
- ~ 1 s - Check the battery level.
- ~ 3 s - Lock or unlock the device clock.
- ~ 6 s - Toggle between clock generator and repeater mode (see the Connections section). The device reboots into the new mode after the button is released, which also resets the device clock.
- > 12 s - Start or stop a battery maintenance cycle (requires external power).
BATTERY - This switch connects or disconnects the internal battery. With the switch on, the device keeps the clock running when external power is removed, so the Harp timestamp is not reset. The switch also needs to be on to check the battery level or for charging.
LED PANEL - At power-up the device runs a short LED animation (each LED lights in sequence twice, then all LEDs blink twice). It then shows the following status indicators:
OUT0–OUT5 - On when a device is connected to the corresponding clock output port. The LEDs also display:
- The battery level, shown on the top row for a few seconds after a short press of the OPTION button (1 LED = low or BATTERY switch off, 2 LEDs = medium, 3 LEDs = high).
- A running battery maintenance cycle, marked by the top and bottom rows blinking alternately.
REPEAT - On when the device is operating as a clock repeater and off when operating as a clock generator (see the "Generator" and "Repeater" tabs in the Connections section).
LOCK - On when the device clock is locked and off when it is unlocked.
STATE - This LED toggles on and off:
- Every 2 seconds when it's sending data to the computer.
- Every 4 seconds when in standby.
- Rapidly when a catastrophic error occurs.
If the battery voltage is below 3.3 V at power-up, the LED also flashes rapidly (5 Hz for 2 seconds) after the startup sequence.ON - On when the device is running from external (USB) power and off when running from the battery. If the battery becomes depleted with no external power, the device shuts down to protect the battery.
Note
When running from the battery, some of the indicator LEDs only flash briefly every few seconds to save power. The panel appearing mostly dark is normal in battery operation.
Back panel
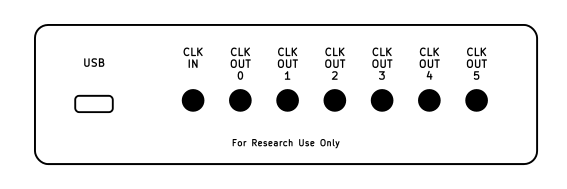
USB (USB-C) - This port connects the device to the computer for communication and also provides the external power used to run the device and charge its internal battery.
CLK IN (Stereo Jack) - When the device is configured as a repeater, the Harp clock received on this port from a CLK OUT port of another device is passed through to the CLK OUT ports instead of the clock generated by the device. The clock can come directly from another Harp timestamp generating device. In addition, some Harp devices do not generate a clock signal but can re-distribute the Harp clock.
CLK OUT (Stereo Jack) - These ports distribute the Harp clock to up to 6 Harp devices. Connect each port to the clock input (CLK IN) port of a Harp device. The device automatically detects which ports have a device connected, reported by the corresponding OUT LED on the front panel.
Connections
The Timestamp Generator Gen3 can be used in one of two modes, generator or repeater, depending on the number of units and connected devices. In either mode, the device is also compatible with other Harp timestamp generating devices.
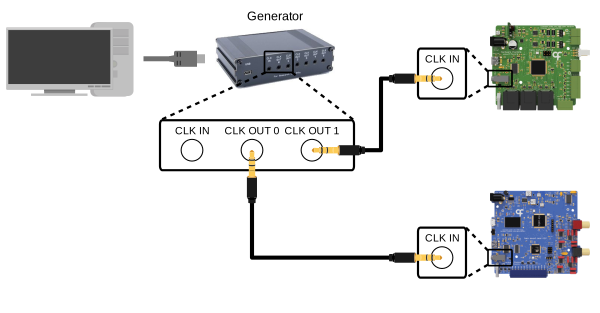
For synchronization of up to 6 Harp devices:
- Connect the USB port to the computer with a USB-C cable. The cable powers the device, charges its battery, and carries the communication with Bonsai. The device should remain on external power during normal operation. The battery is meant to keep the clock running during a power outage.
- Set the device to generator mode (the default). To toggle the mode, hold the OPTION button for about 6 seconds. The REPEAT LED is off in generator mode.
- Connect each CLK OUT port on the generator unit to the CLK IN port of a Harp device with a stereo plug cable.
- Refer to the Set clock article to set the clock of the generator unit from Bonsai so that it propagates to every connected device.